BRICKED SSD ON LIFE SUPPORT
SSD`s are the life blood of our fmadio 10G, 40G, 100G ethernet capture systems. They provide backing storage that well exceeds that of conventional RAM, are super fast and light weight. Thus its prudent to keep the SSD farms in top nick, optimal health, and occasionally perform emergency room brain surgery on them. Unfortunately today is one of those days.

As with all things, it happened late on a Friday night when I was adding a new feature to the system that wipes all capture data from the system. This is simple button click on the web UI page as our clients data is quite sensitive thus needs to be deleted when the box moves internally or externally. The wipe is implemented using the "Secure Erase" ATA-8 command, you can read all about it here. Its essentially a restore-to-factory-setting operation. Meaning after the SecureErase the drive`s internal state is the same as "just left the factory".
Which is great when it works, but this kind of low level drive formatting is pretty complicated with many (presumably) asynchronous operations going on in parallel... and doing 100 of these operations back to back at high speed is probably something the vendor did not expect (I was testing dammit!). In our case this bricked 6 SSD`s rendering them completely useless causing myself quite the stress as I now have several thousand dollars worth of inventory destroyed! - not a good day.

The result is a wall of rather intimidating errors indicating imminent doom with the disk is for all intensive purposes BRICKED.
kernel: [18633.754193] ata2.00: exception Emask 0x0 SAct 0x0 SErr 0x0 action 0x0
kernel: [18633.754204] ata2.00: irq_stat 0x40000001
kernel: [18633.754206] ata2.00: failed command: READ DMA
kernel: [18633.754209] ata2.00: cmd c8/00:08:00:00:00/00:00:00:00:00/e0 tag 0 dma 4096 in
kernel: [18633.754209]          res 51/04:00:00:00:00/00:00:00:00:00/60 Emask 0x1 (device error)
kernel: [18633.754210] ata2.00: status: { DRDY ERR }
kernel: [18633.754211] ata2.00: error: { ABRT }
kernel: [18633.754515] ata2.00: supports DRM functions and may not be fully accessible
kernel: [18633.754614] ata2.00: failed to get NCQ Send/Recv Log Emask 0x1
kernel: [18633.759150] ata2.00: supports DRM functions and may not be fully accessible
kernel: [18633.759215] ata2.00: failed to get NCQ Send/Recv Log Emask 0x1
kernel: [18633.763495] ata2.00: configured for UDMA/133
kernel: [18633.770136] ata2: EH complete
kernel: [18633.770278] ata2.00: exception Emask 0x0 SAct 0x0 SErr 0x0 action 0x0
kernel: [18633.770280] ata2.00: irq_stat 0x40000001
kernel: [18633.770281] ata2.00: failed command: READ DMA
kernel: [18633.770284] ata2.00: cmd c8/00:08:00:00:00/00:00:00:00:00/e0 tag 1 dma 4096 in
kernel: [18633.770284]          res 51/04:00:00:00:00/00:00:00:00:00/60 Emask 0x1 (device error)
kernel: [18633.770286] ata2.00: status: { DRDY ERR }
kernel: [18633.770286] ata2.00: error: { ABRT }
kernel: [18633.770572] ata2.00: supports DRM functions and may not be fully accessible
kernel: [18633.770641] ata2.00: failed to get NCQ Send/Recv Log Emask 0x1
kernel: [18633.775164] ata2.00: supports DRM functions and may not be fully accessible
kernel: [18633.775210] ata2.00: failed to get NCQ Send/Recv Log Emask 0x1
kernel: [18633.779527] ata2.00: configured for UDMA/133
kernel: [18633.786094] ata2: EH complete
kernel: [18633.786205] ata2.00: exception Emask 0x0 SAct 0x0 SErr 0x0 action 0x0
kernel: [18633.786207] ata2.00: irq_stat 0x40000001
kernel: [18633.786208] ata2.00: failed command: READ DMA
The usual suspects to recover were tried and failed, leaving only a few options.
A) RMA THE BOARDS BACK TO THE SELLER
B) CONTACT VENDOR SUPPORT
C) PERFORM SURGERY
Option a) of RMA`ing the boards was the safest option, tho usually you get some other previously recycled RMA`ed device back. Option b) of contacting the vendor is always such a brutally painful experience. It would likely end up with some random "Customer Support" person with a strange accent... giving the default completely useless response of RMA the device and get a replacement kind of thing... ho hum. Which leaves surgery! Now I usually don't go messing with hardware like this (anymore... :) ) because it takes up quite a bit time. However SSD health and prosperity is directly linked to our profitability thus deemed it a worth while time investment to have a more intimate relationship with our SSD models of choice.
The process starts with a general reconnaissance mission of what pins are accessible, and what those pins are for. First up was finding the UART / serial interface but it was silent and likely disabled by the firmware. Next up was what most likely looked like a JTAG interface and... bingo, full JTAG interface connecting and operating as expected.
JTAG is a hardware based system debugger that for CPU`s let you control instruction execution and read/write memory anywhere. You can see in the picture below some soldering of header pins was required, that is then wired to a breadboard which is wired to a Raspberry PI.
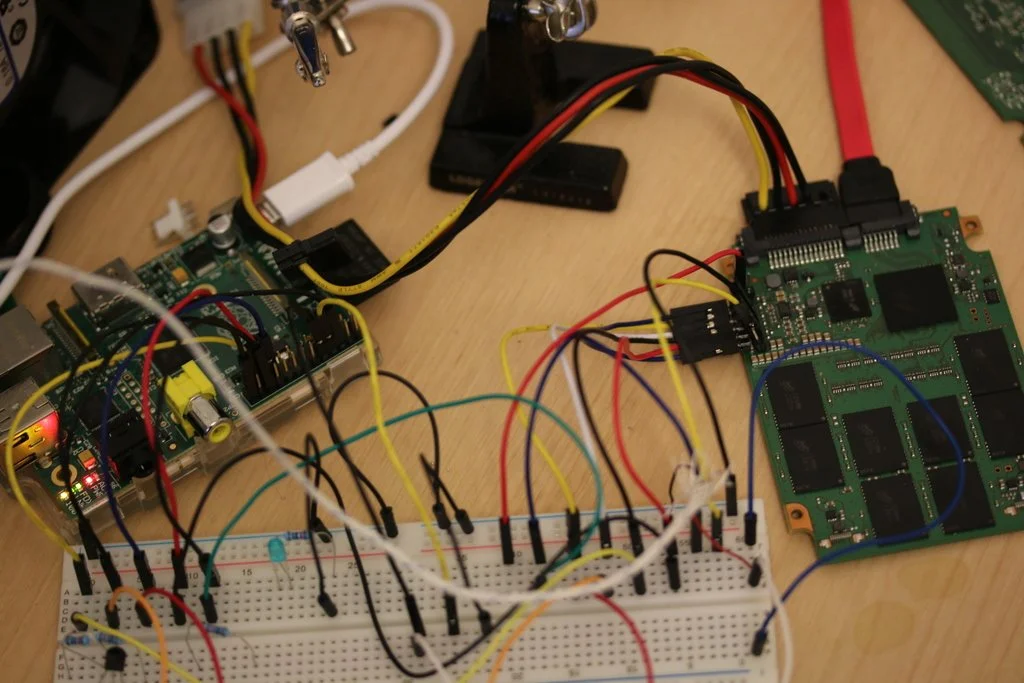
Raspberry PI? wtf ? In this case the Raspberry PI was converted into a JTAG debugger using the outstanding software over at OpenOCD. As "real" JTAG debuggers are quite expensive ranging from $100 - $1000+ making OCD coupled with the PI an excellent low cost alternative.
At this point you get a small rush as you gain access and poke the device, after which the vastness of having no idea what anything does starts to weigh you down. Then slowly bit by bit, instruction after instruction, string after string you gain some intuition on the memory map, what the code does, how its setup and eventually find something interesting.
The first entry point to look for is the classic printf / trace / debug operation which gives you insight into what the software is doing. And eventually managed to track down the code that`s basically
void trace(char* Message, ...)
{
	va_arg list;
	va_start(arglist, Message);

	char buf[1024];
	vsprintf(buf, Message, arglist);

	if (debug_enable)
	{
		fwrite(output, buf, strlen(buf));
	}
}
which writes out a string to a console to tell the developer on whats going on. Note that the code has to "flatten" the string first before even deciding to output or not, which gives us a nice window to sniff the string with JTAG even if nothing is written to the console.
After sniffing strings for a while and getting a better feel for whats happening noticed that the SSD is receiving commands from the SATA host no problem. But there`s some sort of funkyness going on that causes the SSD to send no response back - kind of a one-way-street. One idea to resolve this is: in theory the security erase operation restores everything back to good health. The question tho, is the device actually processing a security erase request ?
... and using our printf JTAG sniffer... it most certainly is processing the request! But failing miserably due to an incorrect password. You can see the sniffed printf jtag string in the output below. Hint: "<SED> Credential Comparison Failed" ASCIIZ string.

Which makes it clear why the security erase / factory reset failed but more importantly you can track down the offending bit of code from this string. That results in the following snippet of assembler courtesy of the IDA toolset below.

To decode that for you its doing a 32 byte long compare against some expected cryptographic hash key. Then the "magic compare" aka instruction CMP R5, #1 is testing if the keys matched. Then doing a conditional jump to a printf routine based on that comparison result BLNE sub_80.... And finally the functions return value is the result of the comparison MOV R0, R5. Nothing particularly fancy going on.
There`s a few ways to go from here. One would be to reverse engineer how the 32B key is generated and create a general purpose exploit. The other would be to just patch the binary such that it thinks it passed the security check. eg Fake a correct password response. We chose the latter as it only takes a few minutes and all I want is to restore the SSD farm`s health. Patching the binary with JTAG is trivial, console output is shown below.

The above shows disassembling the patched code first, the "before" section. This is to check we overwrite the correct bit of code. Then patch it using the command cpu0 arm mww with the value 0xe3a05001. Then disassemble again "after section" to confirm the patch worked and has the correct instruction.
In this case we replaced BLNE instruction (print error message to the console) with MOV r5, #1 at address 0x8009abe4 (shown in blue). The result of the "magic check" is 0 for fail, 1 for pass and write it to register r5. All we did is ignore the whole comparison and simply override it and say the security check always passes (r5 = 1).
...
Now its patched, with cpu`s resumed its the moment of truth. Issuing the security erase operation from the host system via hdparm.
$ sudo hdparm --security-erase 1234  /dev/sdb
security_password="1234"

/dev/sdb:
 Issuing SECURITY_ERASE command, password="1234, user=user
... and it worked! the SSD is back to life, working as normal and running at high speed! ... with several thousand dollars worth of SSD`s back in business making our 10G, 40G, 100G network capture systems more resilient than ever. Now if the SSD vendor (who shall remain nameless) would fix the dam bug so excessive back-to-back security password/erase does NOT brick the device, life would be so much better.